Showing posts with label sew. Show all posts

11.16.2011

Visiting Family

Fayetteville is really growing on us and one of my favorite things about living in NWA is how close we are to family. Sean's mom lives here in Fayetteville and the drive to my parents house is only about 90 minutes, making weekend trips SO easy.

My parents just bought this really pretty home in Branson Creek - it was fully furnished and is really beautiful.
 A couple weekends ago, my Nanny came to visit (mom's mom). Isn't she pretty?! I sure hope I age as well as she does!
 During her visit we went to dinner at the Candlestick in Branson - SO delicious! Here's mom and dad before dinner:
 My little brother Austin and I at dinner and me and dad before we left. I think Austin and I look a lot alike! Austin is a spitting image of my father when he was his age.
This picture is taken from my parent's master bedroom looking into the bathroom. There wasn't a door for privacy! The actual toilet room does have a door, but the bed looks straight into the jacuzzi tub and mom wanted a bit more privacy, so I sewed these drapes for them. The picture isn't that good, but they are mostly green with purple and gold trim.
 I also made mom this Christmas wreath. People decorate for Christmas very early in Branson - it was only Christmas music at the Landing when I was there in early November. 
 My papa (dad's dad) visited Branson last week, but I wasn't able to make it up there due to work. Thankfully, they made a special trip to Fayetteville so we could meet them for breakfast. My papa is arguably the nicest man on the planet! He loves Jesus dearly, has taught preschool Sunday school since I can remember and volunteers somewhere different almost every day of the week (hospitals, driving friends to doctor appointments, a pharmacy, a theme park for special needs children). His heart is so generous and giving and I'm so thankful for his example!
What a blessing our family is!

10.24.2011

Commissioned: banner, bag-o and bench seat

Here are a few commissioned projects I haven't yet blogged about:


These aren't great pictures, but I made a 'Here Comes the Bride' banner for a friend's wedding. Two little boys carried it down the aisle just before Megan and her daddy walked down the aisle. I hope the photographer got a good shot of this banner with the bride in the background! I actually ended up using iron transfer letters for this because that's what I had in hand. If I had thought about it more I would have purchased some iron-on black vinyl and used my Silhouette machine to cut the letters out.
 My boss was having a tailgate and couldn't find his cornhole/bag-o bags, so I made him some. They are really easy! I followed this tutorial. Before I sewed the bags together, I freezer paper stenciled the hogs on. I used my Silhouette to cut out the hogs. I purchased the corn feed from a local farm supply company for super cheap.
 I sewed this bench seat cushion for a friend's sister. That thick foam is expensive! I price shopped for quite  a while and ended up buying it from Hancock Fabrics when they had a 54% off sale. {why 54...why not 50 or 55?}  I used an electric cutting knife to trim it to the size I needed then followed this tutorial for the cover. I would say this is an intermediate-advanced project. If you take it slow you will be fine...there's just a lot of fabric on your machine at one time and some angles to work with. 

9.23.2011

DIY crib bedding

When a friend of mine told me she was going to have a baby boy I volunteers to sew her crib bedding for her and it was time consuming, but a lot of fun. Here are some details and lessons learned on the project: 

I started out following this tutorial for the bumpers. After thinking about it, I wasn't crazy about the rounded edges or that each bumper was a separate piece, so I went in a different direction. That tutorial, though, did talk me through the process of sewing my own piping. Custom piping really adds a finished look to the project and was really easy to do! The new mom to be picked out all of the fabric with a little bit of my input.  

I purchased crib bumper pads from JoAnn Fabrics with a coupon. They look like this. Another way to do this would be to recover an existing crib bumper set, which I think would be easier to manage and you could use the previous one as a pattern for the new fabric. I would measure the distance for the bumper ties and sew them on to the outside fabric before assembling the cover. I forgot to do this and had to hand sew the bumper ties on.
For some reason I can't find the exact crib skirt tutorial, but here's one that pretty easy to follow.

Here's the crib bumper set up in my room and after I added the razorback and monogram, cut from my Silhouette machine and applied with fusible interfacing. You might also choose to do this step before you assemble the bumper covers. I wasn't sure where I was going to place it at that time, so I ironed it on later.

Here's the bedding in Caleb's crib!  

 I also sewed a coordinating valence, which turned out super cute. I took the window width + 12 inches {3 inches on either side of window to allow for valence bar, and 6 inches in the middle for the pleat} x 15" long. I sewed the pocket at the top, tacked the pleat, and ironed it down a bit to ensure a crisp pleat. My serger made the crib skirt and valence project go much quicker than if I would have had to hem all sides, but it's definitely possible.  
I would say that this project would be at an intermediate level. The hardest part was measuring out all of the pieces for fabric amounts and cutting. Just give yourself plenty of time so you can work at a leisurely pace and take breaks when you need to. There are so many adorable fabrics out there and this is a great way to personalize your little one's room!

9.20.2011

A few Silhouette SD projects

I can't tell you how much I love my Silhouette machine. It's so versatile! You just download the Silhouette software from their website and connect the machine to your comp with a USB cord. It can be used to cut heat transfer material, paper, fabric, vinyl, etc. The software is really easy to use and has an interface pretty similar to Word. Here are a few of the projects I have done so far:

I did another upgrade to our front door wreath {it has gone through many changes over the past couple of years}. For this I used Silhouette's flocked white heat transfer material and it worked like a charm. I purchased the heat transfer starter pack from their website and it came with a few different colors. One of the coolest things about the Silhouette software is that you can import any image or font you want to use!
It's kind of hard to see in this picture, but I  imported the Razorback image, traced it and cut it out on fabric. I just iron fabric to one side of fusible interfacing then place that on the thick cut mat with the paper backing still attached. I put the settings on a slow cut speed and it works great! One time there were little pieces that didn't cut all the way through, but I just used an exacto knife to help with that. Then, just peel the paper backing off of your new shape, iron on to fabric and stitch around edge for added durability.

Silhouette does sell their own fusible interfacing for fabric, but for this I just used good old Wonder Under and it worked great.
 This is the same razorback shape and I also cut the monogram out of fabric. I will post this crib bumper project next.
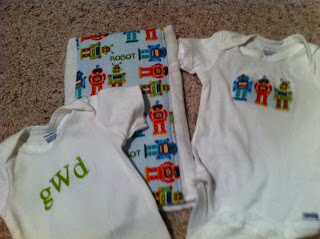
  Another great use for the Silhouette is to cut freezer paper to use for a stencil! It's so accurate and can cut shapes that would take for-ev-er with just a craft knife in just mere seconds. The monogram onesie below is an example of this. I did also make a couple of other precious onesies for a friend's new baby girl, but forgot to take pictures.
The Silhouette is coming out with a new model next month that can cut patterns up to 12" wide {as opposed to the current 8.5"}. I haven't found a need for the wider cutting capabilities myself, but others seem to be really excited about it.

9.13.2011

Pattern Review - The Beach/Bath Robe

Last night I wrapped up this precious little bath robe for my co-workers daughter, Zoey. I used this pattern that Dana from MADE put together.
The pattern was very easy to follow and the project came together quickly. I have two suggestions - the first is to heed her recommendation of using a very thin towel. I used a regular bath towel and it worked ok on my machine, but there were times it was difficult to maneuver the bulky fabric through the serger. The other recommendation is to use a large beach towel. If you use bath towels, you will need two of them. Buying an inexpensive beach towel would have saved on total cost and time.

I made a novice sewing mistake in this project. I didn't have bias tape on hand, so I thought I could substitute with ribbon. It doesn't work. Lesson learned. It's easy to think that bias tapes are just strips of fabric, but their quality of being cut on the bias makes them significantly more flexible and easy to use on curves.

Overall it turned out pretty darn cute and would be great for after bath time or when heading to the pool next summer!

9.08.2011

Pattern Review - Flower Girls Dress

Yesterday I finished sewing a flower girl's dress for a friend who is getting married this fall. It wasn't an easy project, but it was definitely fun to try something different.
Butterick B5458
 I made dress A (tea length) in a size 3T. I used an ivory taffeta for the main fabric and a synthetic silk for the lining. Both are pretty fabrics, but since the taffeta is a pretty stiff fabric, the gathering sections at the top of the skirt got pretty thick, making it very difficult to maneauver through my sewing machine. I got it done, but it took an extra dose of patience and a very slow stitch speed. Making this dress with any type of cotton or seersucker would go alot faster.
 I did add a couple of additional tulle layers to the outside of the dress to make it a little 'poofier.' The dress has a petticoat sewn to the lining that helps it keep it's shape. The bride sent me some extra fabric that her bridesmaids dresses are made out of and that's what I used for the sash.
 The pattern calls for a zipper in the back. I thought that would take away some of the cuteness, so I opted for buttons instead. I waited to do the buttonholes until the dress was together, which wasn't a good idea due to the bulk of the attached skirt. For others interested in adding buttonholes, I would do so after the bodice is together, before you attach the bodice to the gathered skirt.

The pattern is easy to follow and there aren't a ton of pieces to cut. I would rate the level of sewing at a medium and time at approximately 5-6 hours total (shorter if you use fabrics that more easily gather). I would for sure sew another flower girls dress for sentimental purposes, but the reality is that sewing one yourself doesn't save a ton of money (if any) because there are so many websites out there offering inexpensive flower girl dresses. For example, this one.  It's fun to have a custom made dress, though, and lots of love went into this one!

7.28.2011

yo-yo necklace

Sean's cousin Kaitlyn saw this necklace in a boutique shop and sent me the pic.

Using this tutorial, I made a bunch of yo-yos from my scrap fabrics and gave her this necklace when she finished college!
The straps are strips of knit fabric {they roll when you stretch them out} and each yo yo is secured to their neighbor yo yo with a few stitches.
Kait really likes dinosaurs and I had a random dinosaur button - match made in heaven!
This project is really easy and a great way to use up scraps, but there is a lot of tying of knots because I used needle and thread for the whole thing. Try it!

7.24.2011

Scrapbuster DIY headband tutorial

These headbands would be great for a beginner {or expert} seamstress. They are really quick {I finished these three in about 30 minutes} and use materials you likely already have in your craft stash.


Needed materials (per headband):


Scrap fabric, approx 3" x 12" (2)


Fusible interfacing 3"x 12" (1)


1/2 in elastic, about 6" (might need to adjust for your head size)


basic sewing supplies


Cut out fabric (taper towards the edges so it's approx the same width as your elastic). Layer pieces as shown. **Note that the fabric pieces are right side together and the fusible interfacing is on the outside. Stitch around 3 edges, making a tube. Flip right side out (use a pencil to help push it through)


When the tube is right side out, iron flat. The fusible interfacing will help it stay smooth and also provide a little extra structure.
Top stitch around all sides. When stitching around short ends, add in elastic. Back stitch a couple of times to reinforce the stitch.
I chose to make mine reversible, but you could do the same on both sides if you want.
For the braided headband, I just cut a few strips of 45" fabric about 1" wide then braided them. I wanted it to have a frayed look, but if you want it clean, sew wider strips into tubes, then flip right side out and braid. I cut two pieces of the long braid about 12", then secured to elastic.The finished products! I like the versatility of this project: unlimited fabrics/ribbon to choose from, reversible, however wide you want it. Sewing customized projects is a great perk of knowing basic sewing skills.

I'm linking this project to:
Making the World Cuter, The DIY Show Off, Skip to My Lou, Today's Creative Blog, Fireflies and Jellybeans, Beyond the Picket Fence, Tatertots and Jello, Kojo Designs

7.12.2011

Birthday girl onesie

A friend from Columbia has a little girl, Jillian, who is turning one next month -- she asked me to help create her birthday outfit and I was happy to oblige.

I appliqued the cupcake liner and candle, then ruffled the tulle for the 'icing.' Sewed all with my machine.
I also added colorful pleats around the leg. Sewed a fabric tube 4"x20", ironed flat, pinned the pleats then sewed it.

Here's the adorable hair clip that coordinates! It has an alligator clip on the back that can just clip either into her hair or onto a headband. 45" of fabric and two rows of tulle, pleated and sewed onto a round piece of felt.
The tute is made of all bright colors -- it's super cute, but that glitter got everywhere! She only turns one once, though, so I think glitter is in order.

Can't wait to see some pics of little miss in her outfit!


I'm linking this project to:
Making the World Cuter, The DIY Show Off, Skip to My Lou, Today's Creative Blog, Fireflies and Jellybeans, Beyond the Picket Fence, Tatertots and Jello, Kojo Designs

6.27.2011

Date, pillows and t-shirts

This weekend was pretty low key for us. We watched a few movies (Gnomio and Juliet gets an A, True Grit a B- b/c I fell asleep, and Pride and Prejudice an A), went on a date, and I got some sewing in.


Went to Red Lobster for dinner b/c we had a gift card. Then we went for dessert and drinks at Bordinos on the patio.

I sewed my first pillows with invisible zippers. Where have these been all my life?! I seriously loved sewing with them and how the finished product looks so professional. I'll definitely be using them again. Another throw pillow tip: stick with down/feather inserts. If you use stuffed filling, they will be flat pillows within a year.

I also finished a t-shirt quilt top. I fixed that wonky looking white one in the middle after I took this picture. These aren't particularly difficult, just time consuming. I learned a couple of lessons that I will definitely refer back to if I make another one.

I've been doing a lot of custom orders for friends and love it! I like these orders because they're personal and they're helping to pay for my Haiti trip.


That's all for now!

6.20.2011

Weekend Sewing

Sean worked a lot this weekend, so I had some free time to finish some projects I've had for a while. In addition to the apron I blogged about yesterday, I sewed some pillow covers for a friend -- they're for her 10 month old boy. The small pillow was his daddy's when he was a baby!


I don't know why, but this picture of Wyatt cracks me up. Him among all my scraps...bored to death.


I've decided to go with blue, green and white as kitchen colors. Last fall we got new white square dishes and I think the pop of blue is fun. I sewed these new kitchen towels yesterday and love them! You can see a bit of the green zebra print I also bought in the pic above. I'll post a tutorial for the towels soon... {excuse the wrinkles below}

I've also been eyeing these blue and white ikat plastic dishes from Target. Aren't they adorable? I have been patiently waiting for them to go on sale...Sean, you read this blog, right?

That's all for now. :)

6.19.2011

The $100 apron

My sweet Grandma donated towards my Haiti trip in return for an apron. Her only wish was that it include some sort of butterfly (every time I see a butterfly I think of my Grandma because she loves them so much!). I found this precious fabric at Hobby Lobby and lined it with fabric I had on hand.
I followed this apron tutorial. It's a great one! I'm so glad I took the extra time to line the entire thing, topstitch the edges and and serge some finished seams. It's probably the most professional looking item I've ever made. It's definitely not hard to make and it took me about 1:45 from beginning to end. This would be great as a wedding shower, mothers day, or birthday gift!