1.30.2010

Prep in my step

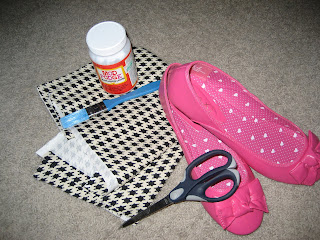
Mod Podge might be my favorite crafting tool...well, besides my sewing machine. You can seriously do so much with it! Here's my most recent mod podge project -- shoes! I'll be totally honest that there were multiple times during this project that I didn't think it was going to work, but in the end I was super excited about the finished product. I used the tutorial found here at Make It and Love It, and will note some of the things I did a little different.
I picked up these flats at Wal-Mart for $5. I did originally try this project on a pair I already owned, but they were a velvet-ish material and the mod podge just soaked in. {So, use a leather-like shoe for this project}

I used a decor weight canvas fabric, thinking it will hold up better on a shoe. It was easy to work with, also.

The mod podge does make the shoes a little more stiff, so I won't be wearing these shoes when I plan to do a lot of walking.

To make the flowers on top I just ruffled some fabric in 1.5 in strips using my sewing machine, then wrapped it into circles, sewed the flower to keep shape and hot glued it on.
I think they're a perfect preppy addition to my wardrobe!
The real life Blossom is on What Not to Wear right now...g2g!
Nicole :)

1.23.2010

Pretty Planner tutorial

I have a small love affair with my planner. It helps in so many ways - organization, streamlining, reducing anxiety, reminding me of assignments, etc. It's not super cute, though...so to fill my crafting void I made a cover for it based on this one I found online. Here's a quick how-to to guide you through my steps {and mistakes}.
First, find pretty fabric you like, one for the outside and one for the lining. I also added an extra layer of fabric to add body {in retrospect, interfacing would have helped}. I picked up this fabric at JoAnns {a fat quarter}. The amount you will need will depend on your planner size - I only needed about 10"x15", so this would be a great way to use up fabric scraps! Cut around the planner -- don't forget seam allowance.

Leave enough fabric to fold over to create an envelope for the planner to slide into.
Ha, I didn't take too many in-between pictures, but next I quilted the strip of fabric onto the outside fabric and flannel interfacing. If desired, add a pocket to the liner fabric {for coupons, pad of paper, pen, etc.}. Pin right sides together. *Now would be a good time to pin the placeholding ribbon and elastic closure {ponytail will do!} in place, so you just have to sew once around. I backstitched some over the elastic to ensure strength. Leave two inches or so open, turn right side out, press and topstitch close. Next, topstitch the envelope section on top and bottom.
A view of the inside pocket:
Sew on a button and you're done!
Next time I'll show you my Mod Podge recovered flats!
Happy Saturday,
Nicole :)

1.20.2010

I'll just save you some time...

I made a couple of small changes to the blog that turned out to take for-ev-er! In case any of my ambitious readers would also like to make similar changes, I've posted my sources here:

To add a little image next to blog posts (mine is the little birdie): click here
To change 'posted by' at the end of a post to something else: click here
To use cute fonts for post and sidebar titles: try this one if you've got time and patience
To make the automatic Blogger navigation bar clear: click here
*note, you can also delete this nav bar, but I use it to quickly login, so I left it on.
To insert a favicon (little icon next the blog title on browser tabs): click here
*another note, I can't get this to work in internet explorer. It does work in firefox for me.
To join an OCD support group (as I probably should), see your physician. :)

I'm planning to add a menu bar just underneath the header to have links like 'crafts' and 'our home'...but don't have the time for it today. I'll post that source when I get it finished.

Turns out that random html computer programming course I took (and hated) in undergrad is coming in a bit useful!

1.19.2010

Back in the swing of things

I was abruptly swept back into the graduate school frame of mind today -- and honestly, I'm not super excited right now. This feeling is way out of my comfort zone, as I've always been a good student and excited to learn...I suppose the upcoming job search and move have my mind elsewhere. I'm going to suck it up for the next 16 weeks and take joy in knowing I'm exactly where God wants me to be.
Sean and I took a trip to Fayetteville this past weekend to check out our next city of residence. Here's a couple pics from the trip (I haven't been good about taking pics recently). We had a great time hanging with Sean's mom, visiting with my brother and sister-in-law and exploring Fayetteville. It's pretty surreal to move to a college town in which you have no ties to the University -- rest assured that Sean and I will unabashedly flaunt our Mizzou gear!
We spotted this car on the U of A campus...I don't know the owner of this car but am imagining a very smart individual.
Sean's mom has started her PhD at U of A...this picture was taken as Sean was playing with the equipment in her lab at school.

We felt a sense of relief when pulling back into Columbia -- it's safe, familiar and full of our friends. Columbia is our home and it's going to be more difficult than I originally thought to leave. We've promised ourselves to be as immersed in Columbia/Mizzou culture as possible over the next four months-- spending time with our dear friends frequently, eating Shakespeare's Pizza a lot and staying active in MU activities.

Here's some of my upcoming craft projects, check back for pics/tutorials:
Mod Podge shoes {you just wait, they're going to be awesome!}
2010 Planner Cover {complete with pen and notepad pocket}
Washers and ribbon necklace
Pretty headbands {flowers, ribbon bows, ruffles...you, know...the usual}
Handmade Valentine cards
Some sort of re-fashion with existing clothes -- maybe take an old sweater and revamp it a bit.

1.10.2010

Ruffles - the girly things, not the chips :)

As mentioned in my previous post, I'm in a ruffle crafting phase right now. For those who are wondering, making a ruffle is super easy. All you do is run a baste stitch {straight stitch set to the longest length} then gently tug on the bobbin thread to make the ruffle. You typically want the initial fabric to be 2-3 times longer than the desired end ruffle length.

*I had two great beginner sewer feats this weekend: I completed a whole project without the need for my seam ripper AND I ran out of one spool of thread. {makes me feel like I've accomplished something!}

Here are some projects I worked on this weekend:
In this season of life, we have lots of friends who are having babies, so here are some pretty cute ruffle butt onezies for someone having a little girl. I used my new B.A. pinking shears that my MIL gave me for Christmas. {they're spring loaded, so you know they're good}
This one I just ruffled some tulle around the neckline for a little feminine touch. I'm planning to adorn another one with a pretty beaded lace.
I also quickly made a flower pin to put on my coat, sweaters, headband, etc. The picture is vertical on my comp, but not in blogger for some reason...sorry about that.
Finally, I made this super cute ruffle necklace. I've seen a few different kinds out in craft blog land, and this one only took about 5 minutes to put together (I already had the fabric and necklace). I did sear the edges of the fabric with a candle flame to prevent shredding.
I'm soaking up all of this extra time I have for crafting right now, as I know once I get back into the swing of school/looking for a job/moving to a new city all this time will somehow disappear. I
hope you've all had a great weekend and feel refreshed enough to face the week ahead!

1.07.2010

Snow day crafts!

I'm a bit snowed in today, as Columbia got about 5 in. last night and I'm not very confident driving in snow. However...I planned for the lock-in by purchasing craft supplies to keep me busy. Here's some of the sewing/crafting I've done so far today:

I purchased a plain t-shirt from Target ($3.50 on clearance) and some ribbon at Michaels (buy 1 get 1 free) to add the ruffled neckline to the shirt. I'm imagining this shirt either with jeans and flats or dressing it up with a new black skirt I just got. (also on clearance....surprise, surprise)
I'm going through a ruffle craft phase right now and will post pictures of my other ruffle projects when they're finished.
I'm pretty darn excited about our new leather chair (that was FREE to us, btw) because we were always one sitting spot short in our living room. I sewed the pillow for about $10 and it only took five minutes of my time. This chair might cramp our little apartment living room, but since we're expecting a new home soon, we couldn't pass up the deal!
I had this cute scrapbook paper I used for our new mail sorter and my cheap-o self couldn't waste the extra of the $0.29 piece of paper, so I covered a picture frame -- and since I love everything associated with monogramming, I added a cute H (scrapbook chipboard letter).
When making the pillow pictured above, I couldn't decide between two different fabrics, so I purchased both (remnants were 70% off at JoAnns). I did think of a great way to use it, though -- making a basket cover that will hold our ever-growing collection of magazines! The basket was 50% off at Michaels, too!

1.04.2010

Organizing

While I realize I'm a little premature, I'm already looking towards the moving process we will be facing in about four short months. Our small apartment has collected an astounding amout of "stuff"...much of which doesn't have a place of its own. Two things that seem to collect around here are: papers/invoices and coats. Enter Hobby Lobby.


To my dearest Hobby Lobby,

You have so many characteristics I admire, not the least of which is the pleasant Christian tunes exuding from your overhead speakers. You faithfully supply a weekly coupon to your store and somehow stay in business even though most of your merchandise is 50% off during any given week. You sell super cute home decor and have all that a crafter could desire. Thanks for affording me the opportunity to fill my home with your reasonbly-priced inventory. Finally, I'm thankful for your many store locations, so wherever our family ends up you will be near.


Thanks,

1.01.2010

Happy New Year!

Oh, hey 2010! Sean and I are very much looking forward to all that the coming year will bring us. Some things we are most looking forward to: my graduation, moving to a new city, Sean starting school, and (hopefully) buying a home!

I decided to make my dress for New Year's, as I wasn't finding much while shopping and the dress I did like from Banana was about $150 dollars. So...with the inspiration from the dresses below, here's what I came up with:
The fabric was just $10 (thanks to a perpetual coupon I have from JoAnns) and I probably spent about three hours total on the dress. I was pretty impressed with how it turned out, as it was my first dress ever. Was it perfect? No...far from it. It was wearable, though, and was fun to tell people I made it when they asked where it's from.
We went out to Le Bourgeois winery for New Years with a group of Sean's Best Buy friends -- let me tell you, there was some excellent people watching at this event!
I hope you all had a happy and safe New Year! I considered this year's event a success, as I was actually awake at midnight!